
White Chocolate Raspberry Sourdough
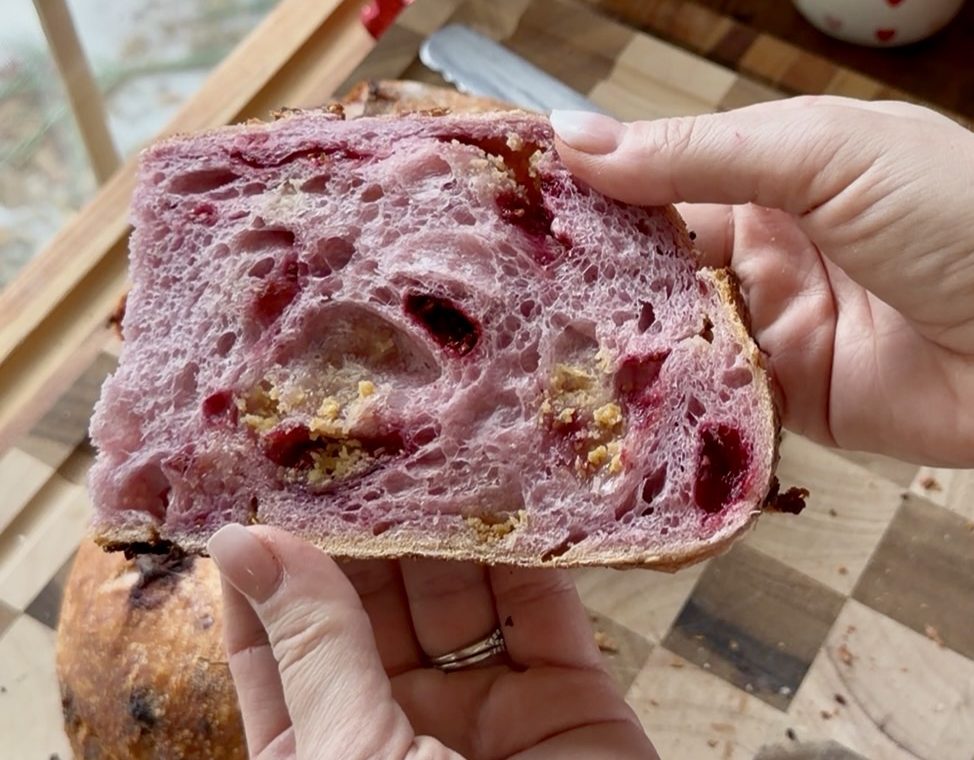
This sourdough is slightly sweet with hints of raspberry and white chocolate. It is naturally colored with sweet potato powder which makes for a beautiful, pink crumb.
Ingredients
Equipment
Method
- In a large bowl, whisk together the water and active starter.375 grams water, 125 grams active sourdough starter
- Next add in the sweet potato powder, vanilla paste, flour and salt. Stir to combine.500 grams unbleached bread flour, 6 grams sweet potato powder, 1 tsp vanilla bean paste or extract, 11 grams refined sea salt
- Knead for 10 minutes and then cover and let rest for 1 hour.
- Perform 3 sets of 4 coil folds every 30 minutes. Cover and rest in between sets.
- Before beginning a 4th and last coil fold, add in 1/4 cup of white chocolate chips and 1/3 cup of freeze-dried raspberries.
- Perform the 4th and last coil fold to incorporate the chocolate and raspberries.
- Cover and let bulk ferment somewhere semi warm. The time will vary depending on the temperature of your home. *Mine rested for 5 more hours which was a total of 9 hours bulk fermenting as it begins from the moment you mix your ingredients. *Look for bubbles on top and non-sticky to the touch dough. It should also be able to pull away easily from the bowl.
- Dump the dough out onto a clean work surface and shape into a large rectangle. *It helps to have wet hands.
- Add on 2 Tbsp of white chocolate and 2 Tbsp of crushed freeze-dried strawberries.
- Fold one side over, ending in the middle and then add 2 more Tbsp each of white chocolate and raspberries to that side.
- Fold the other side over top of that and add the final 2 Tbsp each of white chocolate and raspberries onto that side.
- Roll it up and perform a few push and pulls to create surface tension.
- Flip it upside down into a floured banneton, cover and place in the fridge overnight.,
- The next day, preheat the oven with the Dutch oven inside to 500 F for at least 30 minutes.
- Carefully flip the dough out onto a piece of parchment paper and then place immediately into the Dutch oven.
- Add in a few ice cubes under the paper and then quickly cover with a lid.
- Turn heat to 450 F and bake for 7 minutes. Remove the lid, give it an expansion score down the center, cover with the lid and continue baking for 28 more minutes.
- Once the 28 minutes is up, remove the lid and turn the heat down to 400 F. I lightly covered the top of mine with a small piece of tinfoil so it wouldn't burn.
- Bake at 400 F for another 15-20 minutes or until it reaches an internal temperature of 210 F.
- Let it rest on a cooking rack for 1 hour before cutting into it.
Video
Mixing & Shaping Video: https://www.facebook.com/reel/2181676015935910
Baking Video: https://www.facebook.com/reel/864407549956166
Notes
*This post contains affiliate links.
Leave a Reply